Anchoring special: Better anchoring, episode 3: safely run in the ground anchor - 9 manoeuvres
Lars Bolle
· 24.07.2025
In this special:
- Better anchoring, episode 1: Chain or line, how long?
- Better anchoring, episode 2: 6 tips for the ideal anchorage
- Better anchoring, episode 3: safely run in the ground anchor - 9 manoeuvres
Anchoring can be a wonderful experience - provided the anchor holds. In the previous articles, we discussed the selection of the right anchoring gear and the ideal anchorage in detail. Now let's turn our attention to the manoeuvres themselves. As with most nautical techniques, anchoring manoeuvres are mainly a matter of practice. This is especially true for inexperienced anchor handlers or charterers who are not familiar with the characteristics of their anchor. It is advisable to practise anchoring in moderate conditions before it becomes unavoidable due to a crowded harbour or weather conditions.
Thorough preparation is essential when anchoring. The anchor accessories, consisting of line, chain lead and anchor, should be checked in the harbour of departure, not just at the anchorage. It is particularly important to check the connections and whether spare parts such as shackles or safety straps are available. An anchor ball and checking the depth indicated by the depth sounder, whether under the keel or from the surface, are also necessary. When anchoring, you should be prepared as you would be for a long trip: with a full water tank, charged batteries, the current weather forecast and, even if no overnight stay is planned, a working anchor light.
General information on anchoring
Limit the Schwoi circle
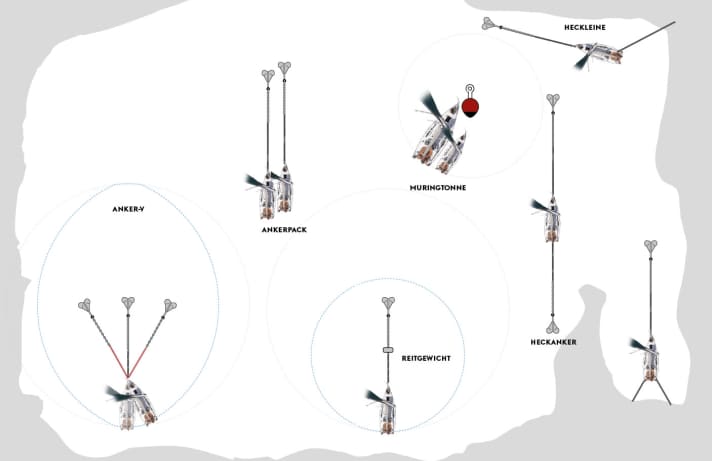
If a bay is already very full, there is really only one sensible rule of behaviour: head for another one! Nevertheless, reasons such as an emergency on board or an approaching storm may leave no choice but to look for another place. As a general rule, the sweeping circle of another yacht is forbidden territory. Modern boats in particular sway considerably at anchor, they literally sail back and forth. However, there are methods to reduce the size of the swell circle, as well as a few other tricks and tips on how to maximise the number of crews enjoying a sheltered bay. However, there is one very important rule that everyone should bear in mind: The fuller the bay, the more important it is to keep a permanent anchor watch and be ready to manoeuvre.
The following shows how to perform the standard anchor manoeuvre and explains special methods, such as using two anchors or shore connections. We have omitted what is known as "chaining", in which two anchors are driven on the same chain in order to increase the holding force. For one thing, it is quite difficult to drive in both anchors evenly. If this is not successful, it is questionable whether the second anchor, which is not well seated in the bottom, will continue to dig in when the first anchor breaks free. Much more important, however, is the poor handling when retrieving. If this has to be done in an emergency situation, it means handling two anchors on the foredeck. The rear anchor then has to be released from the chain before the second anchor can be picked up. Deploying a second anchor, on the other hand, is easier.
Another tip: In an emergency situation, it is not a bad idea to leave the entire harness behind in order to leave the anchorage quickly; otherwise, in rare cases, it may simply take too long to raise the anchor properly, or even two of them in the case of variants. To do this, tie a fender to the end of the hawser or chain, in the case of a chain with a line that is longer than the water depth. Then let the harness out together with the fender. When the situation has calmed down, you can return to the anchorage and the harness can be caught and recovered using the fender floating on top.
Electronic helpers

Echo sounder
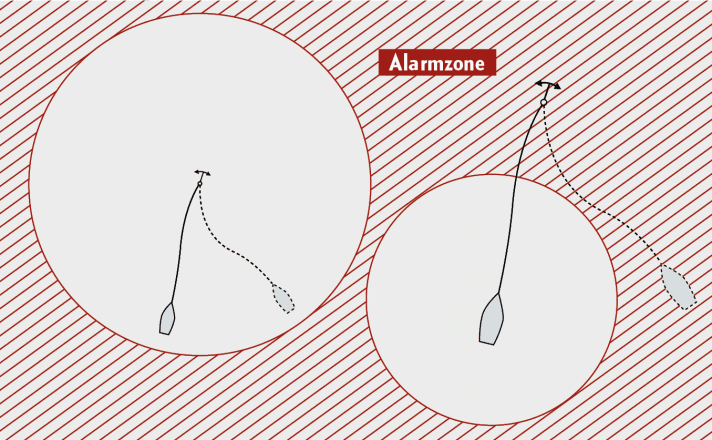
The depth gauge can be used to control drifting of the yacht. However, this only works if the bottom rises or falls in the direction of drift. To do this, set the minimum possible and maximum desired depth as alarm zones. If the yacht moves into shallower or deeper water, the alarm will sound. There is no need for electronics with a hand plumb bob and buoy. At the anchorage, the plumb bob is lowered to the bottom with plenty of slack and the plumb line is tied to the bailer on deck. When the anchor drifts, the sounding line pulls the bailer noisily across the deck.
GPS
The ship's position can also be monitored using a plotter or via a mobile phone or tablet with corresponding apps. A position and a tolerance radius are set for this purpose. If the yacht moves outside the circle formed by the radius, an alarm is triggered. If the position of the anchor is selected as the position, i.e. at the start of the manoeuvre, the alarm circle will later cover the entire schwoi circle. If, on the other hand, the position of the yacht is selected after the manoeuvre and a correspondingly smaller radius is selected, the software also triggers an alarm in the event of strong swaying, as well as in the event of larger wind shifts.
The standard manoeuvre
The smallest and fullest bay should not be chosen for the first attempts. This is not only to avoid collisions - but also to be able to practise in peace. This is because comments from other skippers can quickly lead to uncertainty.
A sandy bottom is very suitable, as is a water depth of two to three metres. If the water is clear, the conditions are ideal. After the manoeuvre, the position of the anchor in the bottom can be checked by sight. ABC equipment is sufficient for this. If the iron is loose or only slightly buried on the bottom, too little thrust was given backwards. Or too little hawser was inserted, so that the angle of pull was too steep. The same applies if a longer track was made in the bottom. This may indicate a poor anchor base or a chain that is too short. The anchor should also be lowered the next morning after a night of anchoring. It can often be seen that the chain has left a kind of fan mark on the bottom, caused by the swaying. If this fan reaches the anchor even in moderate conditions, too little chain has been put in. If, on the other hand, there are several metres of chain from the anchor almost in a single track on the bottom, this is a reassuring sign. Likewise, of course, if the anchor is still in the same position and is buried in the same way as the day before.
This is how's made:
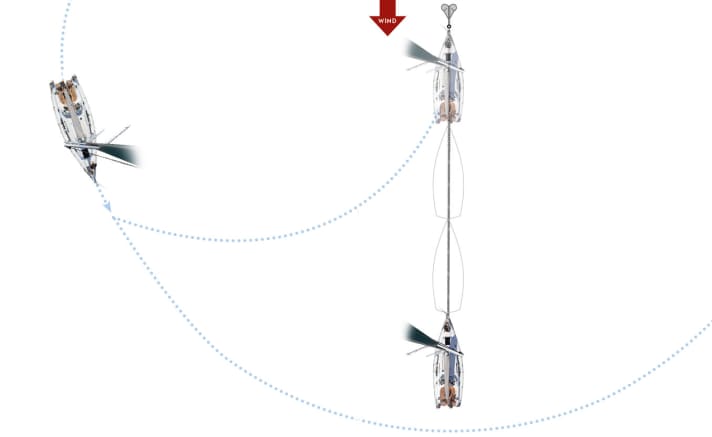
1. explore the anchorage
Circle the intended anchorage at least once. The radius should be as large as the harness to be put in. This makes it possible to recognise any shoals or rough spots as well as the nature of the bottom, and the skipper can be sure of having enough water under the keel even if the wind shifts.
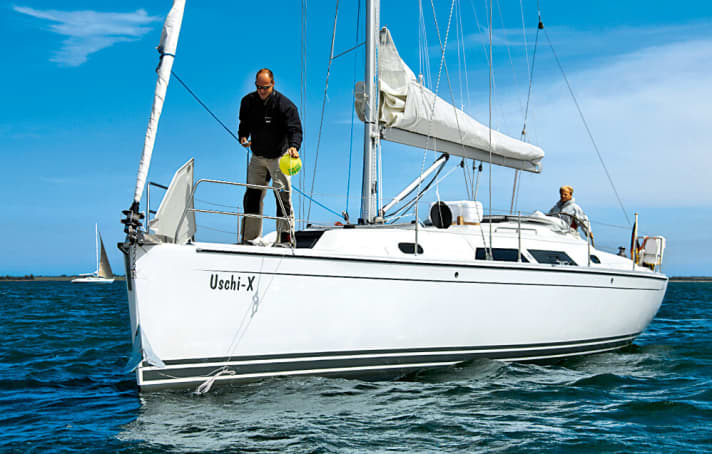
2. drop anchor
At the desired anchorage, the helmsman turns the yacht into the wind. On his signal, when the speed ahead is almost zero, the foreship's mate will drop the anchor in a controlled manner until it has reached the bottom. Except in harbours or in very deep water, the position of the ground anchor should be marked with a buoy. The wind pressure will now move the yacht to leeward; if there is little wind, the helmsman will give reverse thrust. The foreship man furls at the same speed as the yacht is moving so that the harness is laid straight and neither the anchor is pulled too early nor the chain or hawser lie in a heap.
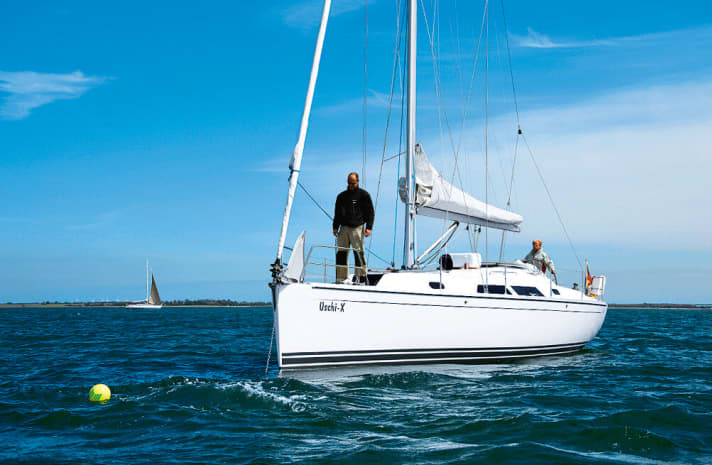
3. the right length
How much chain or hawser? It is important to add the freeboard at the bow to the water depth, both together give the depth. If you are only anchoring for a short period, such as a lunch break, and the crew is staying on board, it may be sufficient to use three times the depth as anchor gear. For safe mooring over longer periods, the rule of thumb is often to use seven times the depth (including freeboard) as the length. However, depending on the harness, whether chain or hawser, as well as the water depth and the yacht's area exposed to the wind, the lengths actually required can vary considerably. In detail, the in this article explained.
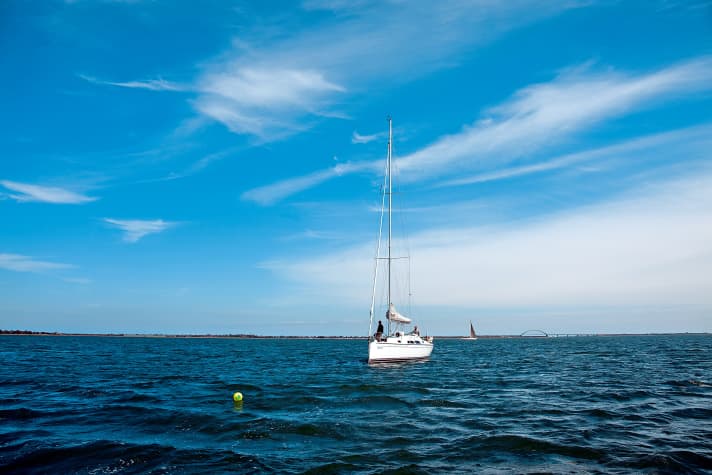
4. bury anchor
Once enough chain or hawser has been put in place, you can start digging in. To do this, initially give a little headway astern so that the anchor has the opportunity to turn into the correct position and so that the harness is not too tight. Allow the anchor a few minutes to dig in deeply. The helmsman can tell when the anchor is holding by taking a shore bearing or, if the water is clear, by taking a bottom bearing. Another good method is to place a hand on the chain/rope. If it jerks, the anchor rumbles across the bottom. If you want to stay overnight or in rough weather, increase the tension a little, depending on the motorisation. If the anchor breaks too early, the harness must be extended or a second anchor deployed. Incidentally, it is not recommended to pull into the harness with a running start aft.
5. deploy second anchor
In order to increase the holding force of the gear or to limit the yacht's room for manoeuvre, it can be useful to deploy a second anchor. It should be sufficiently dimensioned for the size of the ship and ideally have a chain lead and a hawser. The angle between the anchors depends on the desired effect. The closer they are to each other, the greater the holding force at a constant wind direction - but the greater the circle of woe. At the other extreme is the mooring: both anchors are at maximum distance from each other, 180 degrees, the yacht can no longer swerve, only turn on the point, but only one anchor holds.
Vermuren
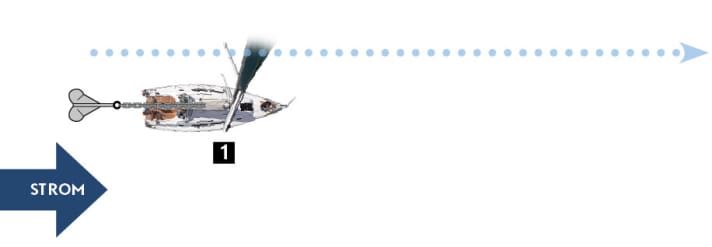
1. deploy stern anchor
Suitable for anchoring in tidal areas or with changing wind directions. First, an anchor is deployed on a very long hawser over the stern against the wind and/or current

2. deploy bow anchor
Then drop the second anchor over the bow. You can also start with step 2, the sequence makes no difference. If the second anchor is deployed with the dinghy, the hawser of the first one does not need to be as long
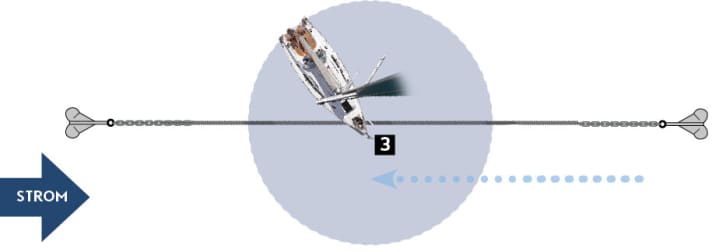
3. connect
The yacht turns round on itself when both anchors are attached to the bow. It remains stationary, however, if one hawser is at the bow and the other at the stern. In this case, however, wind or swell can hit the yacht from the side and cause it to lie very unsteadily
Anchor-V across the wind, also single-handed

1. deploy stern anchor
An elegant manoeuvre that requires minimal effort and can also be done single-handed. The yacht is steered at right angles to the wind and the first anchor is dropped at the stern to windward. It can also be deployed at the bow, but this harbours the risk of the hawser coming into contact with the propeller

2. dig in stern anchor, deploy bow anchor
Once enough hawser has been set, it is covered and the first anchor is dug in a little. Some yachts can now be balanced with thrust ahead and rudder angle so that they remain at an angle to the wind. You have to experiment a little, also with the rudder angle. If this is successful, the helmsman can calmly lower the second anchor at the bow into the water
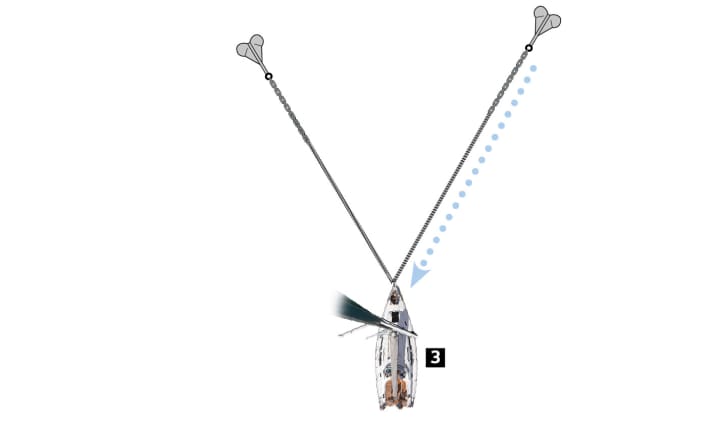
3. insert hawser
The second hawser is now lowered as far as the first and then secured. If the first hawser was fixed at the stern, first attach its loose end to the bow, then release it at the stern so that the yacht turns with the stern to leeward
Against the wind with a machine
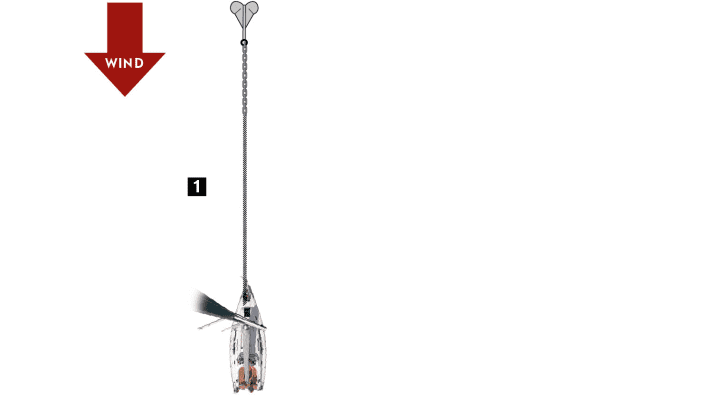
1. normally anchored
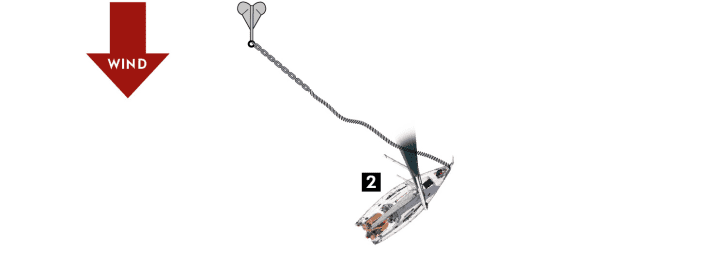
The yacht is correctly anchored. If the wind picks up or the centre of gravity needs to be reduced, the second anchor can be moved into place with the aid of the engine
2. bring into position
Head towards the first anchor in the direction of pull, then turn and steer diagonally to windward until the first anchor is abeam. Anchor buoys are important for checking this. There should be little or no pull on the harness, otherwise the first anchor could break free

3. deploy second anchor
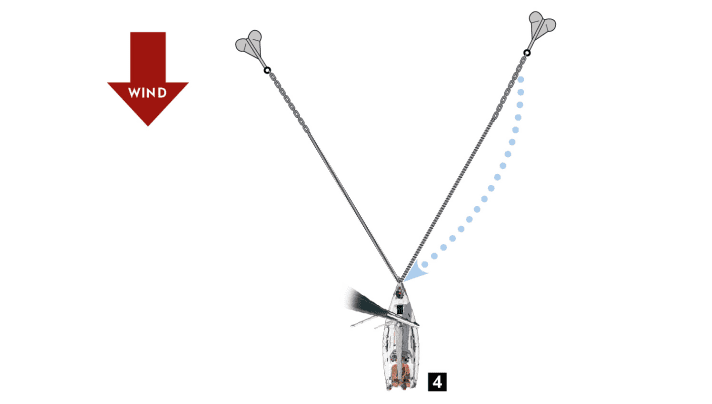
The second anchor drops, the wind drives the yacht to leeward. As much hawser is put in as for the first anchor
4. burying
When both hawsers are occupied, slowly dig in the anchors with reverse thrust
Anchor V with the dinghy
1. normally anchored
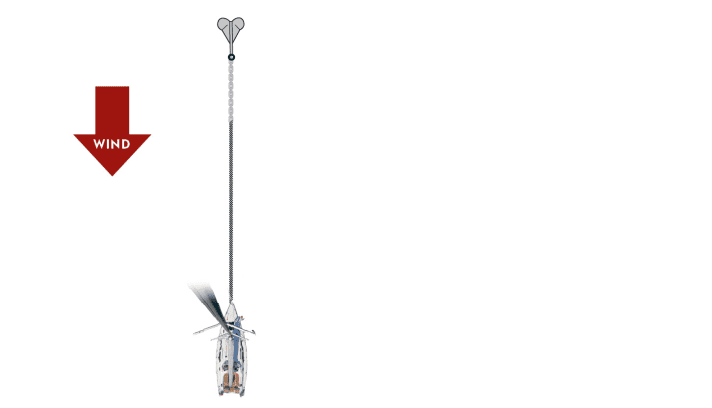
The situation is the same as when deploying with an engine. With this method, however, other anchors are less disturbed by engine noise and there is less risk of the first anchor breaking free. The disadvantage is that the transverse distance between the anchors can only be estimated
2. load and deploy second anchor
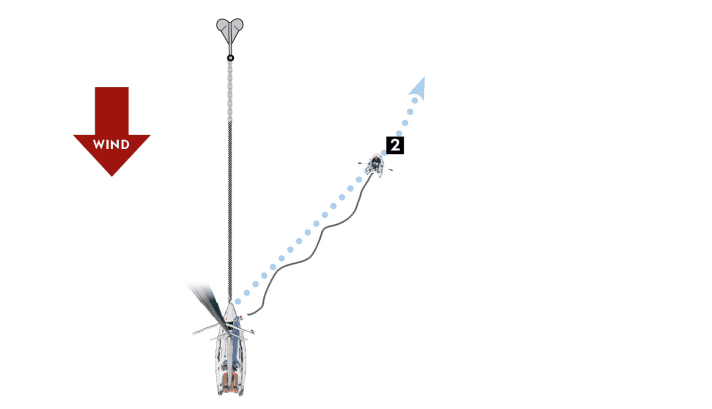
The anchor gear is located in the dinghy. The end of the hawser is connected to a safety line that is towed from on board. In this way, the dinghy does not have to be rowed against the hawser, which may even be impossible depending on its weight. That is why this does not work with a chain
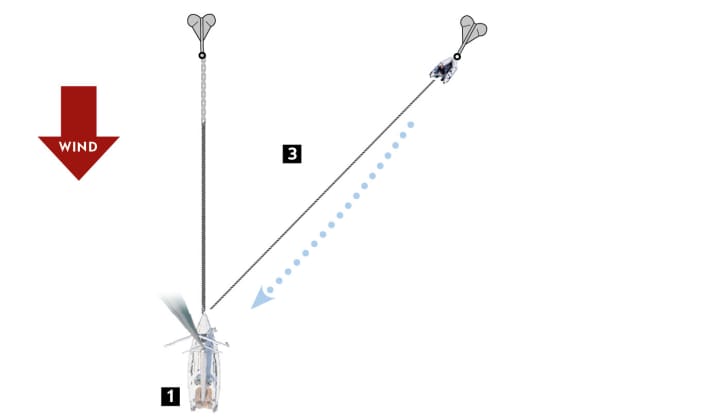
3. pull in the hawser
The second anchor is deployed and marked, the hawser is brought on board with the safety line. If the dinghy driver holds on to the hawser, he does not have to row or sail backwards
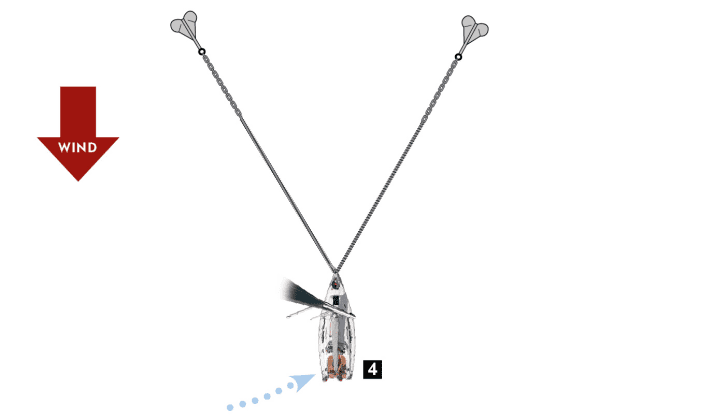
4. cut the cables to length
Tighten the hawsers until both are the same length, i.e. the yacht is centred between the marker buoys. Dig in both anchors again
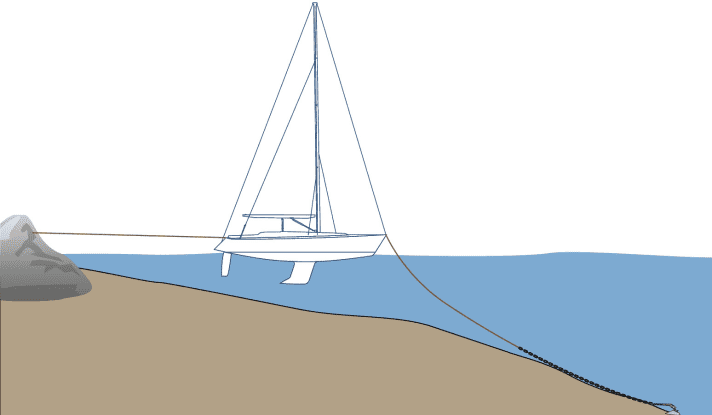
Deploy shore lines

1. deploy bow anchor
A method for steeply sloping ground, as is often the case in Turkey. The anchor is deployed at a depth that is just compatible with the length of the harness. The anchor often holds very well because it is pulled "uphill" at a favourable angle. However, if the yacht turns into the low area, as is always the case with offshore winds, the anchor quickly breaks free

2. deploy shore lines
To avoid this, shore lines are deployed to prevent the yacht from turning and swinging around and to keep the anchor gear under tension. The shore lines can either be deployed from the yacht by dinghy or by swimming. However, it is easier to go ashore with the dinghy first, attach the line there and return to the yacht with it in the dinghy
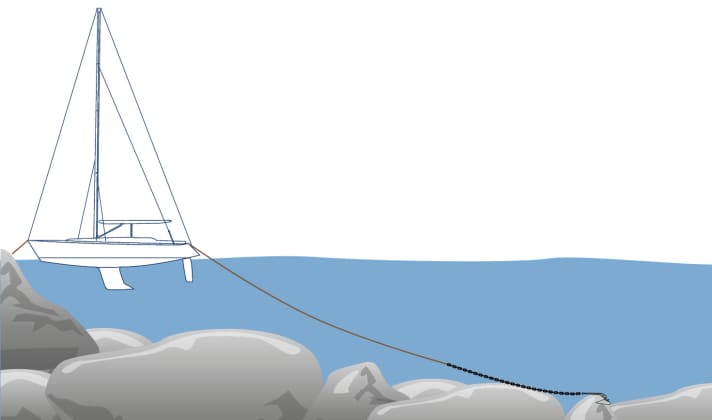
Mooring at skerries

Deploying the rear anchor
Many skerries drop so steeply into the water that you can moor to them and walk ashore on dry land. A stern anchor is deployed first. Block the hawser once in a while during deployment to test whether the iron has snagged. There is only one choice here - tight or loose. Several attempts may therefore be necessary
Deploy stern anchor to the shore

1. deploy bow anchor
Sometimes a long, shallow beach drops off abruptly to greater depths - not an ideal anchorage. However, if you still want to stay, even if only for a swim, you need a stern anchor instead of a shore line. The bow anchor is deployed in the deep area and holds very well as it pulls "uphill"

2. deploy stern anchor
The stern anchor can be deployed with the yacht or, if it gets too shallow, with the dinghy and prevents the yacht from drifting into the deep area. If the second anchor is brought very far into the shallows, it sometimes has to be dug out by hand
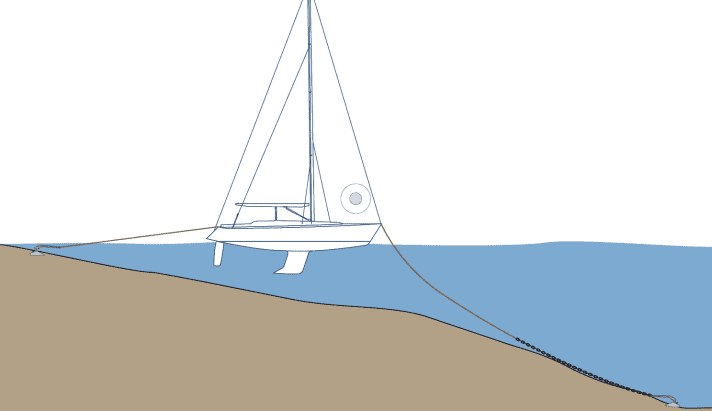
Deploy anchor single-handed

1. drop anchor over the stern
An elegant swing that not only single-handed sailors should master. The anchor should not be used with a full chain, as there is a risk of scratching the hull. The chain leader should be stowed in a bucket at the stern. The end of the hawser is attached to the bow (see below) and led outboard to the stern. The helmsman drops the anchor at the stern and fastens the leader and hawser

2. bury anchor
If the harness is long enough, you attach the hawser to the stern and wait until the wind pressure has dug the anchor in. You can help with the engine and have very good control over the yacht, as the rudder blade is being driven by the propeller

3. turn the yacht
The hawser at the stern is released, it swings round and the yacht now hangs with its bow in the wind

And now have fun practising!
Video recommendation:

Lars Bolle
Chief Editor Digital

