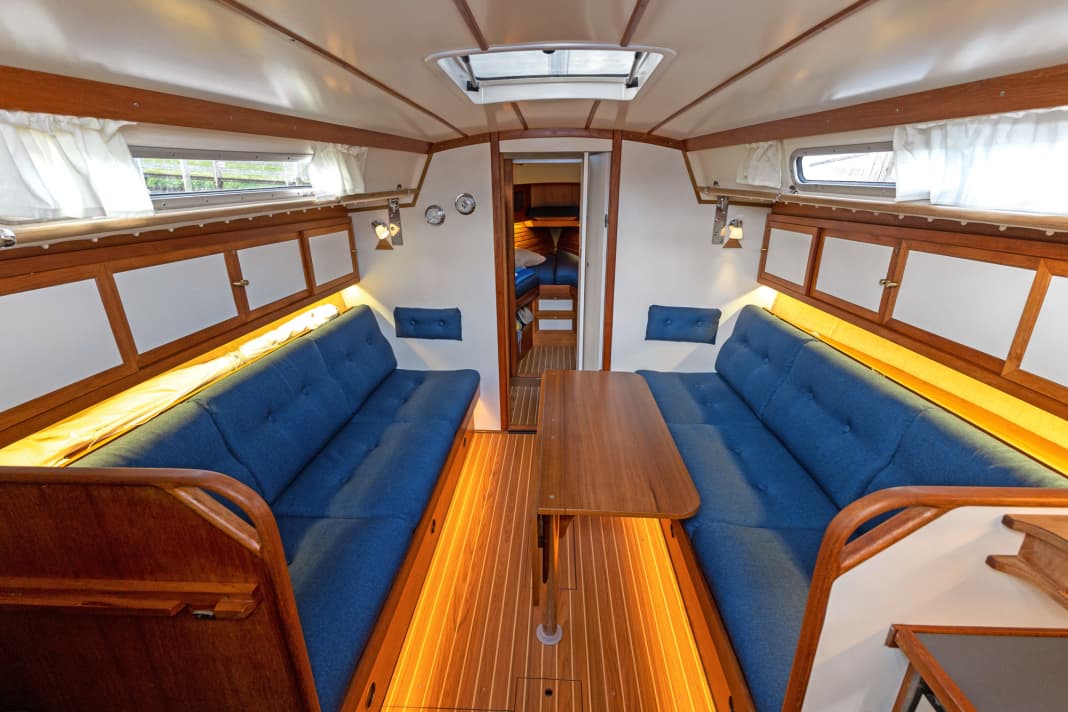


Owner Andreas Woyda spent around two months at the weekends in winter storage, giving the dark teak interior of the LM a light, but nevertheless aisle-like appearance. Although the originally planned 100 hours were not quite enough in the end, the effort was more than worth it.
Interior Refit series:
- Part 1: Simply try out how the new style can be simulated with on-board tools
- Part 2: Colour change, how dark Scotsmen become white and friendly
- Part 3: Light and air, how to retrofit deck hatches correctly
- Part 4: Setting accents, how LED lighting creates new cosiness
"It feels like a new boat," says Woyda. In fact, the 37-year-old interior looks incredibly fresh after the remodelling, but at the same time so harmonious that you could be forgiven for thinking it came from the shipyard. Just how great the contrast is becomes clear when compared with the before photos.

It's not just the white bulkheads and lockers or the light-coloured ceiling panelling that make the difference, the replacement of the floorboards has also worked wonders. The mere fact that the floor now appears to be a single piece from the saloon to the forecastle improves the impression enormously. Considering that it was comparatively little work to cut the new floor from the Hydropont laminate board, the floor boards and the painting of the ceiling panels are among the most effective modernisation measures. Thanks to the new indirect floor lighting. The owner will never have to crawl into a dark cave again.
Retrofitting LED lighting in the salon: how it works
Floor lighting is now standard, at least on high-quality new boats. After all, it sets the interior centre stage beautifully. The arrangement of the LED lighting is primarily about two things: reducing shadow areas and illuminating the beautiful wooden fixtures, which radiate warmth.
Shaded areas include the lounge floor, for example, where the light from the ceiling lamp never reaches because there is a table above it or the ceiling light is simply too weak. The new teak-look floorboards provide the ideal conditions for underfloor lighting.


However, the additional light was not only intended to set visual accents, but also to provide real added value. Unlike today, the interior lighting could previously only be activated via the control panel in the navigation corner. So when you got to the boat at night, you had to climb into the companionway in the dark, press the main switch and fumble for the light button - anything but convenient. The solution to the problem promised to be a light switch directly on the companionway. Ideally without the hassle of pulling cables.
The LED light must be suitable for use on board
You can find a large number of suppliers of LED technology on the internet or in DIY stores, with an enormous price range. As the technology on land and on the boat is operated with 12 volts, there is nothing to stop you from using strip lights or LED tubes for house lighting.
When purchasing, however, care should be taken to ensure that the lamps and light strips are suitable for use on the water. For example, it is important to avoid open contacts, as they will quickly corrode in salty air. In addition, the purchase of suitable strip lights is not enough. What is important are suitable mounting options - and these are rarely supplied.
Special systems for use on yachts
One exception is the Swedish manufacturer Båtsystem. The Swedes have several systems in their programme especially for indirect lighting. The one metre long mahogany slats are particularly practical. The mouldings are rounded on the upper side and slotted on the lower side. Depending on how the light is to be emitted, they can be mounted upright or horizontally.
The mouldings can be attached to the fronts of the bunk benches, for example. This includes the mini-sleeve light tube. It is 4.2 millimetres wide and is pressed into the slot. The special feature here is that the LEDs are not soldered flat onto the strip, as is customary in the trade, but on its side.
They therefore emit the light to the side of the strip. There are connection options for the power supply at both ends. The LED hose is available in two or five metre lengths and can be shortened every five centimetres. This creates an easy-to-fit and energy-saving footwell lighting system. By using a dimmer, it can also be permanently illuminated at sea and at night; it ensures that every step below deck actually ends up where it should.
Wireless switches are easy to install and eliminate the need to lay cables
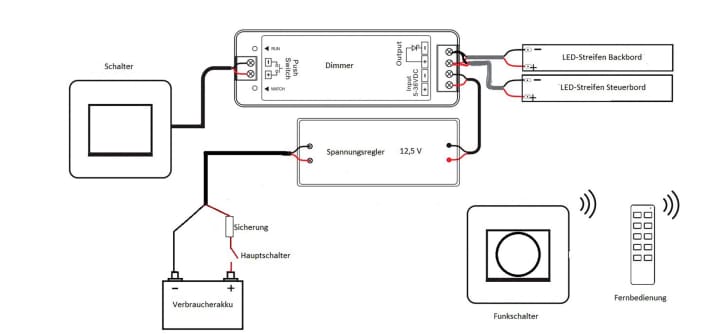
Speaking of dimmers: the Swedes also offer several versions of these. The simple versions are integrated directly into the light switch. However, the Polaris black box model is particularly suitable for retrofitting. It is simply looped into the supply cable of the LED strips and can be controlled either via a classic wired switch or by radio, see circuit diagram below. There are also matching wireless light switches that can be installed anywhere on board. They are powered by a button cell and do not require any wiring.
Each dimmer can be linked to up to ten wireless switches. This means that the light can be controlled from the companionway and from the forecastle and aft cabin, for example. For particularly extensive lighting installations, several dimmers can even be combined and grouped into lighting zones. The simple floor lighting on the LM requires only one dimmer and one wireless switch on the companionway.
Reading lights and pantry lights are also being replaced
Replacing the reading lights is simply a matter of selecting a suitable model and replacing them. As the original wiring was designed for the significantly higher power consumption of light bulbs, there is no need to worry about the additional USB sockets on the lights. They do not support fast charging and therefore require very little power. Only the connection of the reading lamps had to be changed slightly. As there is no space for a terminal in the base of the new lights, the cable connection had to be moved to the neighbouring cupboard or behind the bulkhead.
The situation is similar in the pantry, where we were also able to simply replace the old-fashioned fluorescent lamp with LED technology. In principle, an LED strip such as the Mini-Sleeve would also have been suitable.
In order to be able to adjust the illumination better, we have chosen a so-called functional lamp. The light strip is inserted into an aluminium tube and is fitted with a switch. The tube is rotatably mounted in two clips and can be aligned so that the hob and work surface are optimally illuminated.
Circuit diagram for the LED installation

Wiring the LED lighting is quite simple. One major advantage is the low power consumption of the strips. The mini-sleeve we use (Båtsystem; www.gotthardt-yacht. de) draws 200 milliamperes per metre, so no large cable cross-sections need to be used and the additional lighting can generally be connected to existing lighting cabling. As we also want to use the footwell lighting as a night light so that we don't have to climb into the boat in the dark, we have connected it independently of the switch panel directly behind the main switch. The voltage regulator is not necessary in combination with a dimmer, as the dimmer keeps the voltage within the range suitable for LEDs. However, it can be used as protection for unregulated LEDs. The light sources are often only designed for 12 volts. If the on-board voltage rises to 13.8 volts or more due to the charger or alternator, the LEDs will age excessively.

