Winterising lifehack 1:An auxiliary construction protects the back during sanding

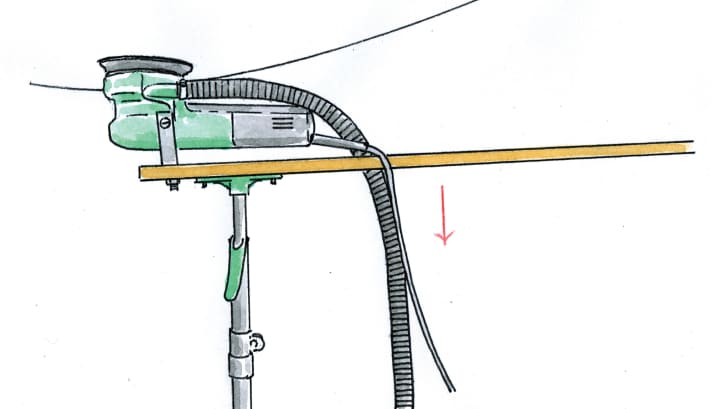
We sand the underwater hull every year so that our antifouling does not build up too thick a layer through the annual coating and then flake off the hull. This work under the hull quickly becomes back-breaking, as just holding up the sanding tool is exhausting, not to mention the strength required to exert even light pressure with the sanding disc. That's why we made an auxiliary device from a telescopic support from the DIY store, two metal brackets and a square timber. The sander is attached to the end of the timber with the brackets, and the support is screwed against it from below just behind. The support is then adjusted to the right length under the boat so that the sanding disc touches the antifouling. The support is guided with one hand, while the other hand can be used to vary the pressure between the sandpaper and the underwater hull by gently pressing down on the other end of the wooden batten.
Manfred Kreitz, Bremerhaven
Winterising lifehack 2:Illuminate the main boom and mast for repairs with a string of lights

If there is something to be cleared in the boom - in our case it was the transmission of the lower leech stretcher running there - you need a light that is not too strong and uniform along the entire length of the dark tube. Torch light through the side openings is just as inadvisable as a lamp at the other end, which will only dazzle you.
For example, a Christmas light chain with the smallest possible yellow LEDs is much more suitable. This is attached to a light, round weight (we used two small snap hooks) and carefully shaken into the tree profile pointing diagonally downwards. The regular arrangement of the lights also allows you to estimate the position of the wings quite accurately from the end, which is helpful when making new lines, for example. The fairy lights are of course also suitable for illuminating other repair areas.
Marion and Stefan Sprickmann, by e-mail
Winterising lifehack 3:Foam brush & an old roller for smoothing freshly painted surfaces

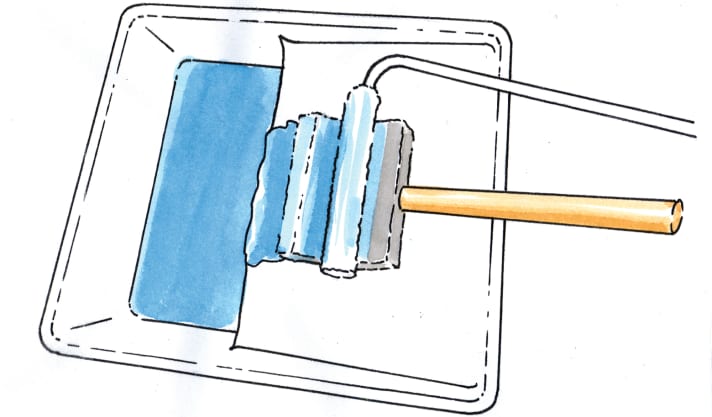
Our mahogany dinghy cruiser regularly needs a new coat of varnish in winter. When rolling up, too much varnish is usually applied, which quickly results in unsightly runs or orange peel. To avoid this and to create a beautifully smooth lacquer surface, we sand immediately after rolling. To do this, we simply use a foam brush to smooth out the paint, while the foam absorbs any excess paint.
As the barrel deck alone has quite a large surface area, the foam brush is quickly completely saturated. To squeeze the paint out of the brush, we removed the fur from an old paint roller so that all that was left was a cardboard roll. This makes it very easy to roll out the foam brush on the paint tray without getting your fingers sticky. It then absorbs any excess paint so that you can continue blending.
Günter Hansen, by e-mail
Winterising lifehack 4:Line guide for the orbital sander

We use the orbital sander for the tedious "overhead work" in the midship area.,without having to lift its own weight. To do this, two lines are stretched lengthways along the fuselage and a wooden subframe with four screw eyes is clamped to the sander to hold the lines. The lines are threaded through the eyelets, pulled tight and hold the sander to the fuselage. The machine can now be moved back and forth lengthways for working. It is possible to move about 50 centimetres across the ship before the lines have to be adjusted.
Peter Hülsen, Bremen
Winterising lifehack 5:Old pavilion as rain protection for masts

The problem with overhauling wooden poles in the open air is the weather: once the old paint has been removed, no direct moisture should be allowed to reach the wood. Similarly, no rain should fall on the coating for several hours after painting. With at least eight coats of varnish on fresh wood, this is a problem because the accuracy of the weather forecast is not sufficient over such a period. In addition, dew collects on the coating in the morning. So the boat should actually be painted in the boat shed. However, if it's not just round the corner, travelling to the boat shed just once for painting can be very time-consuming. To be able to overhaul our wooden mast in our garden without a lot of travelling, we made a shelter out of an old pavilion. The right-angled side sections serve as a roof frame and were connected with cable ties, while the cross struts of the pavilion became supports. A DIY store PVC film, simply attached with tape, serves as the roof. A standard pavilion thus provides eight metres of cover.
Anni Brucks, by e-mail
Winterising lifehack 6:Grip with pliers without scratching

Some maintenance work was needed on our pump toilet, seals and non-return valve had to be replaced. To do this, we dismantled the entire pump. The pump rod had to be held with the pipe wrench, whereby there is a risk of leaving notches in the metal surface with the gripping jaws of the wrench. These would then not only be a visual blemish, but would also destroy the seal during pumping. All the work would then be in vain. The manufacturer recommended wrapping adhesive tape around the pliers to prevent scratches. However, to prevent the structure of the gripper jaws from being pressed through, you have to use a lot of adhesive tape. It also has to be removed and replaced several times during maintenance work. To avoid wasting so much tape and to speed up the process a little, we came up with another option: to tame the pliers a little, we cut off two pieces of an old water hose about five centimetres long. These can then be placed over the gripping jaws of the pliers to protect them from scratches. The fairly soft plastic surface also provides a good grip - ideal for holding a workpiece firmly and securely without leaving marks.
André Schedelbeck, Erlangen
Winterising lifehack 7:Drugstore items help with screwing

Sometimes screws have to be removed on board in hard-to-reach places where the screwdriver still fits but your fingers no longer do. At the latest when the screw needs to be put back in place, it becomes difficult, especially when working overhead.
In such cases, we have had good experiences with a special tool that is actually intended for removing ticks. The screw is held in position using tick pliers with a loop, and thanks to the narrow shape of the tool, installation in corners that are inaccessible to the fingers is no problem. As soon as the screw has been tightened with a few turns, the loop can be opened and pulled over the screw head onto the screwdriver - this prevents the loop from being tightened as well. Once the screw is tight, the plastic loop is removed from the screwdriver. The tick tweezers are available online for less than 10 euros.
Peter Knüppel, Cologne
Winterising lifehack 8:Leak detection with plunger

To avoid any nasty surprises when slipping, we use the rubber bell of a suction rod ("plunger"), as used for drain cleaning. This is pierced in the centre and attached to the syringe of a garden hose. The suction cup is then pressed onto the drain outlet from the outside and the water is turned on. Even if the bell is not completely flush with the hull, the water pressure is sufficient to make leaks visible.
Dieter Behrens, Hanover
Winterising lifehack 9:Simply keep the side passages free of vegetation

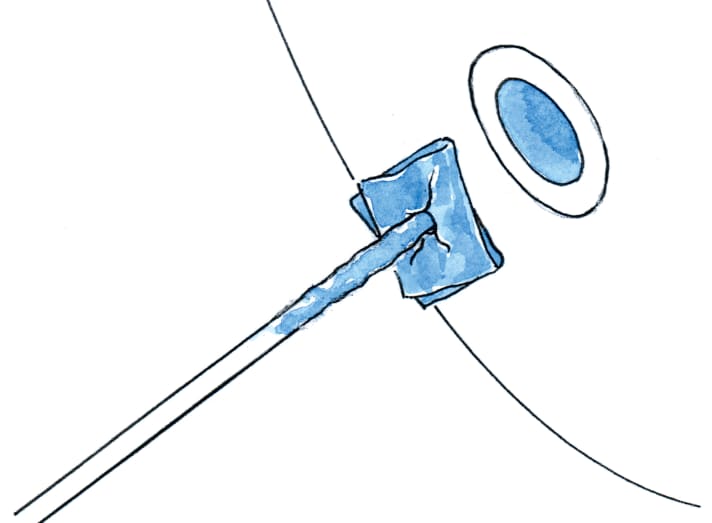
Most yacht owners apply a fresh coat of antifouling every season to protect their underwater hull from unwanted fouling. In the past, we have had the problem that some of the underwater passages have become overgrown over the course of the season. What is merely annoying at the inlet to the toilet, for example, can lead to engine failure in the cooling water pipe and potentially result in expensive repairs. That's why we are now also thoroughly protecting the onboard passages against fouling. To do this, we use a piece of threaded rod (a long screwdriver or a paintbrush handle also works) and pieces of strong cotton cloth. Cut two or three squares out of the cloth, their edge length should be slightly larger than the diameter of the pipe. Then pierce a hole in the centre of the pieces of cloth and place them on the threaded rod. With this aid, the antifouling can be distributed very well in the through-hull passage.
Wolfgang Dinse, Kiel
Winterising lifehack 10:Keep brushes fresh for longer with a disposable glove

When painting, we often use various brushes and have to apply several coats over several days. To avoid having to clean the brushes, we put them in a preserving jar with turpentine substitute and put a disposable glove over them. This ensures that the jar is airtight, the brushes do not dry out and are ready for immediate use. We also put disposable gloves over the paint cans after closing them. Experience has shown that they do not dry out so quickly.
Viktor Schacht, by e-mail
Do you have any advice for other sailors?
We will honour the publication of your lifehack with50 EURO.Please add photos or sketches. We also need your address and bank details
Submissions to: Editorial office YACHT, Quartier O, Paul-Dessau-Straße 8, 22761 Hamburg; or: mail@yacht.de

