
Cleaning the underwater hull
The underwater hull should be thoroughly cleaned in autumn. This can be done with a high-pressure cleaner, but you should be very careful when doing so, otherwise you will not only shoot down the fouling and pockmarks, but also the antifouling.
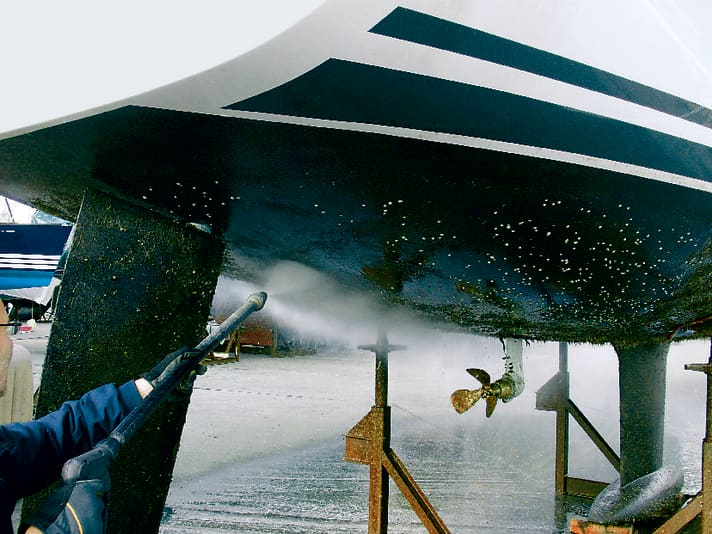
This applies in particular to self-polishing antifoulings, which can thin out very quickly during high-pressure cleaning. It is therefore better to clean mechanically with an abrasive pad.
Oil residue almost always collects at the water pass in particular. Re-washing with a Scotch-Brite or abrasive sponge and clean water will achieve the desired result.
If you want to be on the safe side, add a cleaning additive to the wash water as a grease remover. The rough surface of the sponge is sufficient as a pre-treatment for self-polishing paints. Hard antifouling requires a little longer scrubbing; the washed-out colour surface must be removed. Antifouling should never be sanded dry - the unavoidable dust is harmful to health.
During the wash cycle, you should check the underwater hull: Is the old paint still firmly in place? If there are large areas of damage, a complete repaint is actually necessary. With a special epoxy primer, even a dilapidated paint structure can be stabilised to such an extent that it will last a few more years. The product is appropriately called Antifouling Anchorage.
Osmosis test
Autumn is also the best time to check your boat for possible osmosis damage. This involves inspecting the hull for blistering, which is most pronounced in autumn. The boat has been in the water for around six months and has absorbed water. If a decomposition reaction has started, the osmosis bubbles are at their maximum size at this time and are best recognised.

Over the winter months, the liquid diffuses back out through the gelcoat, the pressure in the bubbles decreases and it may be that in spring there is nothing left to see. The owner may then diligently sand the entire underwater hull and only then realise that there is osmosis damage. Then all the work was for nothing, because the antifouling would be blasted off during an osmosis treatment anyway. The best way to detect osmosis is to use sunlight as a grazing light or generate it with a torch. The bubbles cast shadows and are very easy to recognise. If you find any, it is best to consult a specialist.
We answer all questions on the subject of osmosis in our Osmosis special.
Preparing the underwater hull for antifouling
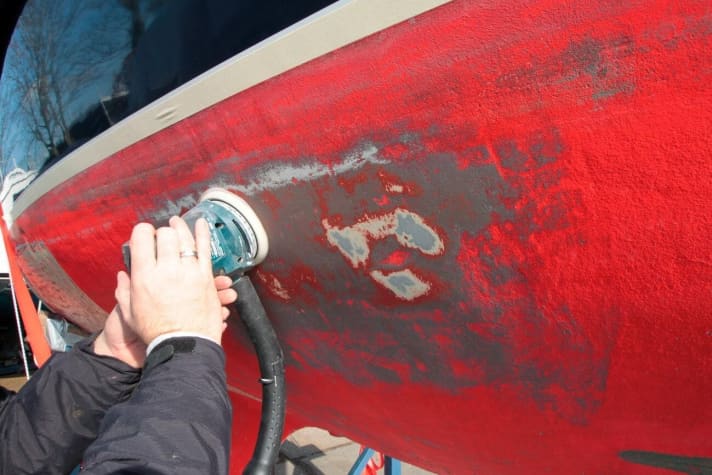
If you have neglected to clean in the autumn, you will have to do even more preparatory work in the spring. Normally, self-polishing antifouling does not require sanding before a fresh coat is applied. However, if the algae growth was not removed in the autumn, it will remain as a dried layer on the antifouling in the spring. Sanding is usually the only way to prevent it from coming off later.
The basic rule for self-polishing antifouling is: as long as there is antifouling on the hull, it will remain effective. So if the old antifouling layer is still intact, there is no reason to paint over it - it is harmful to the environment and costs money and time.
The only problem is recognising whether there is still enough antifouling. One trick is to work with different colours. For example, the painting professionals at Peter Wrede GmbH in Wedel near Hamburg spray the first coat of antifouling in green, and only then apply the actual top coat in the recommended thickness. As long as no green is visible, there is no need to repaint.

This can also be recreated with existing antifouling by painting the first coat a light grey and then the final colour. However, this is only possible if the first coat is also an antifouling. A primer of a different colour is not suitable. This is because as soon as this is visible, there is no more antifouling on the hull and it becomes overgrown.
Unlike self-polishing antifouling, hard antifouling must always be sanded when it is used up and needs to be reapplied.
Self-polishing and hard antifoulings can usually be painted over directly together. If in doubt, however, a layer of primer matching the new paint should be applied. It is more difficult with Teflon paints. These are only compatible, if at all, with another thin-film antifouling. In this case, you must ask the previous owner or shipyard for the exact type of paint.
Antifouling should be applied with a foam roller or a short-haired mohair roller. It is better to apply two thin coats than one thick coat. Bring the can of paint to room temperature beforehand and stir well.
Recognising antifouling
A simple test can clarify whether a self-polishing or hard antifouling is present: If the polishing product is rubbed off with a damp cloth or sponge, traces of colour will remain. Hard antifouling shows virtually no removal. Thin-layer or Teflon antifouling can be recognised by the almost lacquer-like, significantly smoother surface.
You can find instructions with photos for recognising the antifouling coating in this Special article.
Note the dew point when applying antifouling

When applying antifouling, care should be taken to ensure that the dew point is not exceeded. An owner will never have the same ideal conditions as a profile painter, for example, but he can at least avoid major mistakes. This means that the hull must always be at the same temperature as the ambient air or warmer. If the hull is colder than the air, the moisture in the air condenses on it and the antifouling is applied to a film of moisture. This can lead to poor adhesion and later to peeling. The best conditions are usually in the afternoon, when the temperature drops again but the hull is still warm from the day. Applying antifouling in the morning will definitely go wrong. This is because the hull is still cold from the night, but the air warms up more quickly and the yachts sweat.
The temperature difference between the hull and the air can also be easily measured using a laser thermometer from a DIY store for the hull and a normal thermometer for the air. However, don't just measure the hull, but also the keel, as this is normally colder because it heats up more slowly. If you have the opportunity to take the boat outside when applying antifouling, you should do so, or at least open the hangar door. This allows the hull to dry better and also allows the solvents to evaporate more easily.
Check keel-hull connection
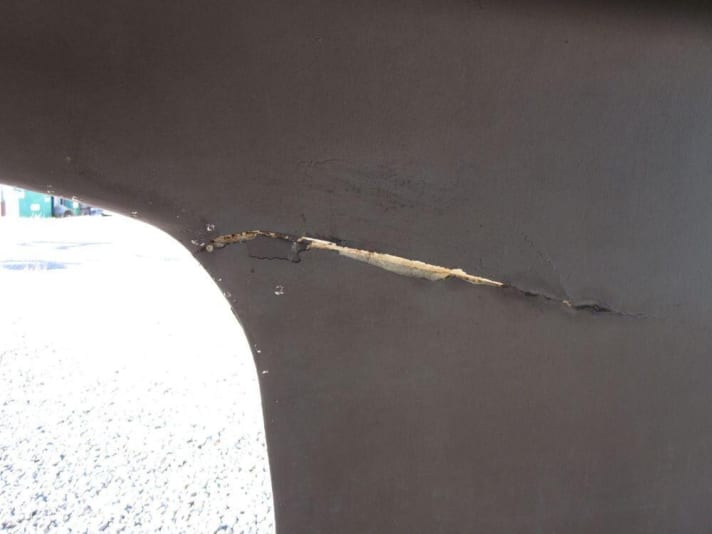
The keel should be checked for mechanical damage, especially if there has been grounding - i.e. whether there is any damage to the leading edge or chipping or hairline cracks at the keel root and the hull. Also check whether the joint sealant between the keel and hull has come loose. If this is the case, there is no longer sufficient flank adhesion of the keel and the keel can work. In addition, water can then penetrate the structure and cause osmosis on the hull side and corrosion damage on the keel side.
As this grout becomes brittle over the years, it should be replaced from time to time. Simply cut out the joint with a sharp knife such as a carpet knife and re-grout with a polyurethane sealant. There are several products available for this, such as Saba, Pantera or Sikaflex. However, as this area is very sensitive due to osmosis and corrosion protection, it is perhaps better to leave this to a specialist before you go at it yourself and smear it all over.
At the same time, the keel bolts should be checked internally for tight fit and the surrounding area should be checked for hairline cracks or flaking of the topcoat. If in doubt, always consult a specialist. But this is also better done in the autumn, because if there is major damage that requires more extensive repairs, there will be enough time in the winter.
Treat rust spots correctly
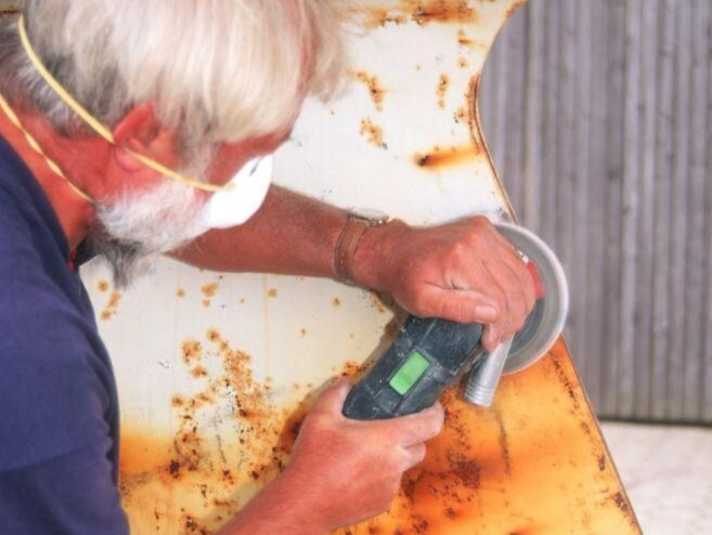
Rust on the keel is not a general warning sign unless it occurs in the area of the hull connection; on the keel it is more of a visual problem. In addition, the antifouling may not adhere so well to rust. However, it does no senseI recommend tackling the rust with an angle grinder or brush and then applying a barrier coating such as Primocon - you can't get into the corrosion pitting with an angle grinder. The rust would soon be back on the surface.
Only sandblasting penetrates these pits and guarantees a metallically clean substrate. The application of corrosion protection is also not completed with one or two coats. One layer brings about 20 micrometres, three layers therefore 60, but corrosion protection only starts at 350 micrometres in areas permanently exposed to salt water.
Seacocks and hoses
According to insurance broker Pantaenius, a classic case of damage is valves left open from which the hose slips off or leaks due to signs of ageing. You should ask yourself the following questions:
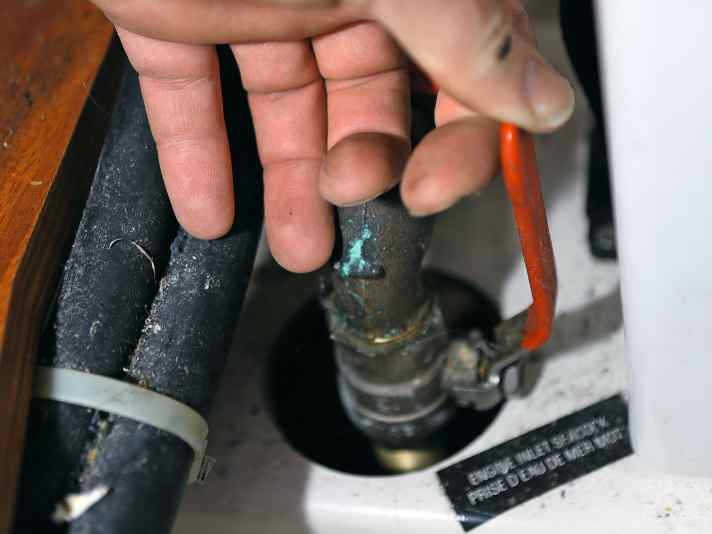
Have the hoses become hard? This should also be checked in autumn. Then they should be replaced. Are all hoses firmly connected to the respective valve, have two hose clamps been used everywhere? Are the seacocks all in good working order? Be sure to check the sea valves for corrosion from the outside, as this can only be detected from the outside. You can also see any impurities that could lead to overheating in the machine, for example. A valve plan is a good way of knowing where each seacock is located at all times.
Checklist underwater hull
- Pox and algae growth
- Damage
- Osmosis
- Antifouling adhesion
- Apply new antifouling
- Exterior keel-hull connection
- Keel bolt inside
- Keel sole
- Corrosion on the keel
- Seacocks
- Hoses on valves
- Clean encoder from log and plummet
- Visual inspection of the stuffing box or saildrive sleeve, shaft play
- Observe the maintenance interval for the Saildrive sleeve
Download free of charge: Checklist for the start of the season PDF

