

It's actually just routine: before the boat is moored for the week, I quickly open the inspection cover and close the seacock on the toilet inlet - but the valve feels damp somehow, and there is actually a little water next to the onboard outlet. There is also a trickle of water running towards the drainage hole in the floor pan. Immediately the calm is gone: we have water in the ship! Admittedly, given the amount of water, it will probably be a few months before it sinks. But there is still a need for action, because who is to say that the water ingress won't increase? So up with the floorboards and go in search of leaks. It's not as clear-cut as it seems at first glance, because the suspected seacock and the ship's culvert are ruled out on closer inspection with a torch - fortunately, or should we say unfortunately? Because this is the start of an arduous search for clues.
Causes of water in the boat

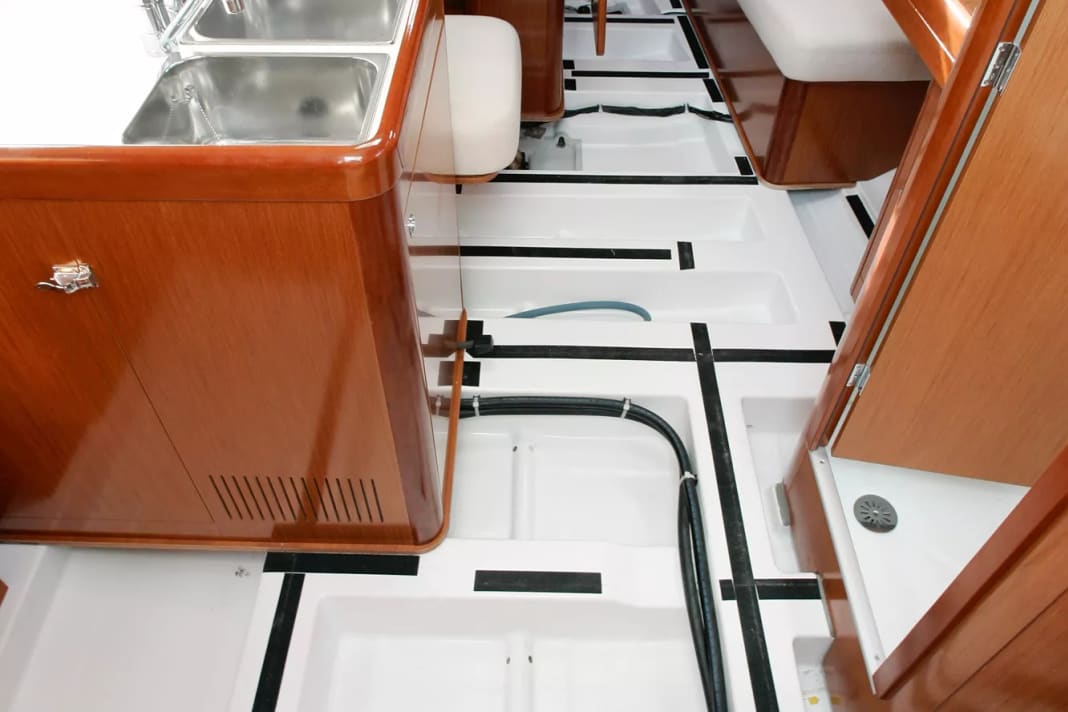
What is sloshing under the floorboards doesn't really taste salty, and the water trail also seems to be leading to the ship's passage rather than away from it. However, the leakage cannot be traced any further than the next floorboard, because, as on most modern GRP yachts, the reinforcements are glued into the hull as a large moulded part. To allow the water to run from the compartments created in this way to the lowest point, the shipyard has drilled holes in the floor wings, but has saved on inserting connecting pipes for cost reasons. In this way, the leaking water disappears somewhere in the hollow bottom section. In addition, residual water inevitably remains in the hull, as the bilge pump was installed one floor higher, at the lowest point of the floor assembly. The water level has to rise to around two centimetres before it gets wet. If you estimate the surface area of the entire hollow space in the floor assembly, this results in around 15 to 20 litres of undischargeable residual water, which is distributed throughout the ship as it sails.
It is therefore clear that the leak is unlikely to be detected directly, but must be localised using exclusion tactics. This involves draining the bilge or the floor assembly to some extent. If the structural conditions allow, you should try to provisionally seal all drain openings with plasticine or body sealing tape to divide the bilge. Then observe the level changes and correlate them with the use of the boat and the weather conditions, see flow chart below. The more systematic the approach, the greater the chances of success.
Systematic leak detection

The first thing to find out is whether the water comes from outside or from the fresh water system. In saltwater areas, a taste test may help. Depending on how clean the bilge was beforehand, tasting may require some effort. If there is obvious oil contamination, this should be avoided; cleaning agent residues can also falsify the result. If the water can be clearly identified as fresh water, all on-board outlets and seawater pipes can be ruled out.
The next question concerns the weather conditions. It could be rainwater making its way into the bilge behind the inner shell, which is also present on the deck. Then every deck fitting, every cable duct and, in the case of keel-mounted rigs, the mast profile would also be suspect. If you consider the number of screws that are used to bolt a genoa rail through the deck alone, it quickly becomes clear that there are plenty of holes. If the fittings are accessible from below, a visual inspection during prolonged rain or after a thorough deck wash is usually sufficient. The search behind panelling is much more time-consuming. Then only a lot of patience and working through every single fitting will help.
To do this, form a dam around the fitting, for example using modelling clay. Water is then poured in to form a lake. At the same time, look below deck for possible traces of water. It takes a while for the water to emerge from the inner shell. It is therefore difficult to judge when a fitting can be considered tight and to switch to the next candidate. To speed up the system and check several fittings at the same time, you can work with different coloured water. If there are inspection covers or openings in the inner shell, blotting paper or kitchen paper can help to find traces of water.
More remote areas can possibly be examined with an endoscope camera. Models that can be connected to a tablet and smartphone are available online from €30, although the resolution is relatively low. We have had good experiences with the slightly more expensive five-megapixel model from Depstech. The advantage of the camera is that it may also be possible to locate the leak based on deposits of traces of water that have already dried. This is particularly interesting if the leak only occurs when the fittings are under load. Typical cases are jetties or even the hull-deck connection. In the harbour, they can sometimes even withstand constant rain, whereas sail pressure or heavy seas can lead to water ingress even in combination with drizzle or spray.
The water pipes were also laid in the floor group and are inaccessible. In our case, it hadn't rained for several weeks and the deck hadn't been washed either, which rules out fresh water from the outside and puts the fresh water system in the spotlight. But that doesn't make things any easier, because the shipyard had obviously laid the pipes in the floor assembly before it was glued into the hull, i.e. just below the taps and behind the pressurised water pump, they disappear into the longitudinal and transverse stiffeners to emerge again directly in front of the boiler. As there is hot and cold water in the galley, the toilet and the cockpit shower, there must inevitably be a number of branches installed; unfortunately, these are also hidden from view. After all, the documentation for current boats includes a drawing of the pipework. However, it is not certain that this actually shows all the couplings. After all, every pipework coil comes to an end and has to be fitted. On older yachts, such installation sketches are generally not available or are obsolete due to subsequent conversions.
The utilisation analysis
To determine the starting point for the leak detection, it is again helpful to analyse the usage. Is the amount of water in the bilge linked to the fill level of the tank? Does the pressurised water pump start automatically even though the boiler is cold, or does the water level increase when the boiler is heated by shore power? As the water expands when heated, the safety valve can open and release the excess pressure along with a sip of water. If the boiler is also heated by the engine's cooling circuit, prolonged engine operation can also lead to water loss. The fresh water pump, tank and boiler are the most important points to check. The only way to check the concealed pipes and hose connections is with the aforementioned endoscope camera.
Low water temperatures are an often underestimated cause of supposed leaks. Below the waterline, most yachts are built from solid GRP laminate; this insulates much less well than sandwich and forms a cold bridge. This becomes a problem, especially in spring, when people are living and sleeping on board. A person loses up to two litres of water when sleeping alone. The air warmed up by the heating absorbs the moisture and transports it to the side of the boat, which may be just five degrees cold, where some of it condenses. As the process takes place in secret and there are several square metres of condensation surface, considerable quantities accumulate over time.
Help, a salt water leak!
With a salty taste, it's time to keep calm! The ship's thru-hulls and keel bolts are reflexively targeted. However, without prior damage caused by a massive grounding, water ingress via the keel bolts is unlikely. On-board outlets or seacocks damaged by galvanising and the hoses connected to them are more likely to come into question. However, the first place to look should be the engine compartment, especially the cooling water system.
In addition to the sea water pump and the hoses, the aerator is a hot candidate. It is actually supposed to prevent negative pressure from forming when the engine cools down and cooling water from entering the combustion chamber. However, if the valve is blocked by limescale deposits, it no longer closes and the engine forces the cooling water out. Anything is possible, from an initial drip to a full jet. On yachts with shaft systems, the stern tube seal is another prime suspect. Leaks in the exhaust system, for example at the water collector, are sneaky. This is often well hidden. If only a small amount of water escapes from there, it usually does not even reach the visible bilge area during short engine running times, but dries off beforehand. The water only reaches the bilge when the engine has been running for several hours. In this way, the detection of a porous weld seam has kept many a crew busy for a summer. Unfortunately, other leaks also have this potential.


