In this article:
"I find increased moisture levels in the rudder blade on around 70 per cent of the boats examined," says Uwe Gräfer. The expert is not only commissioned by insurance companies, but also by buyers of used boats. Buyers and sellers alike are often surprised by the diagnosis. "This is a common type of damage on older yachts," says Gräfer. And without any damage or grounding.
"The problem lies in the construction of the blades. As a rule, two half-shells are laminated. The rudder shaft with its spoke-like struts is placed in one shell and firmly laminated. The side parts are then glued together and the blade is foamed," explains designer Martin Menzner. This results in a comparatively light rudder with a good profile accuracy, which is also very easy to mass produce.
Possible weak points of a rudder blade
However, the design has several weak points: One is the bonding of the two sides. In the early days of GRP, the half-shells were often only glued together with a type of polyester filler. As the blade always bends and twists a little when sailing, the brittle adhesive seam often tears and water penetrates. In the worst case, the halves separate completely from the rudder shaft under extreme loads in heavy weather or after grounding.
With better bonding technology or additional laminate strips, manufacturers now have the joining of the half-shells relatively well under control. In contrast, the transition to the rudder shaft is still problematic. The rudder stock is usually made of stainless steel or aluminium and cannot be permanently bonded to the GRP.
Osmosis damage
Even epoxy resin only creates a positive fit around the shaft. Added to this are the different thermal expansion coefficients of GRP and metal. "Sooner or later there will be hairline cracks at this point," says Menzner. The water finds its way through them into the interior and spreads there. Unlike prefabricated core materials such as Divinycell, the material is generally not closed-cell, which means that water can spread throughout the rudder over the years until the core is completely soaked.
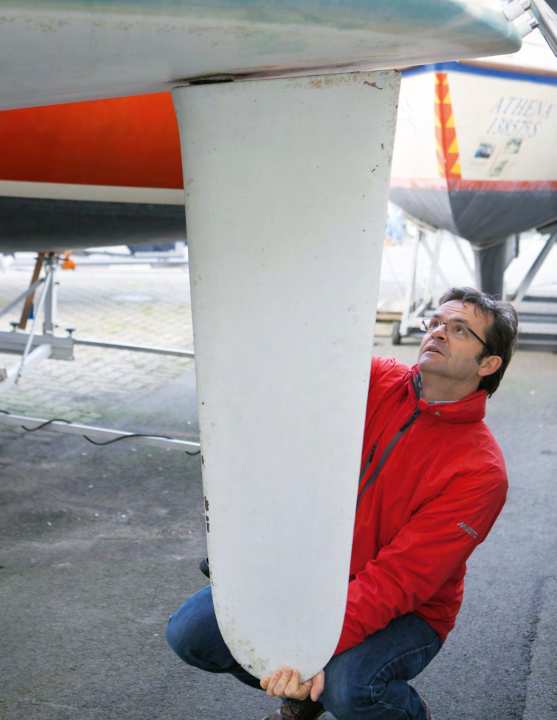
Constant water contact of the polyester laminate has far-reaching consequences, as it can lead to osmosis damage, even if the rudder blades are protected from the outside by epoxy primer. The polyester resin then dissolves from the inside. The insidious thing about this is that the osmosis bubbles mainly form behind the scenes. The problem is only recognisable from the outside when the moisture has penetrated the laminate. By then, the structure is usually already severely damaged.
Hydrolysis also affects the attachment of the rudder stock. If the polyester resin dissolves, the shaft, which is often only laminated on one side, can come loose and move in the rudder. The blade is then levered apart under load.
Frost in winter storage
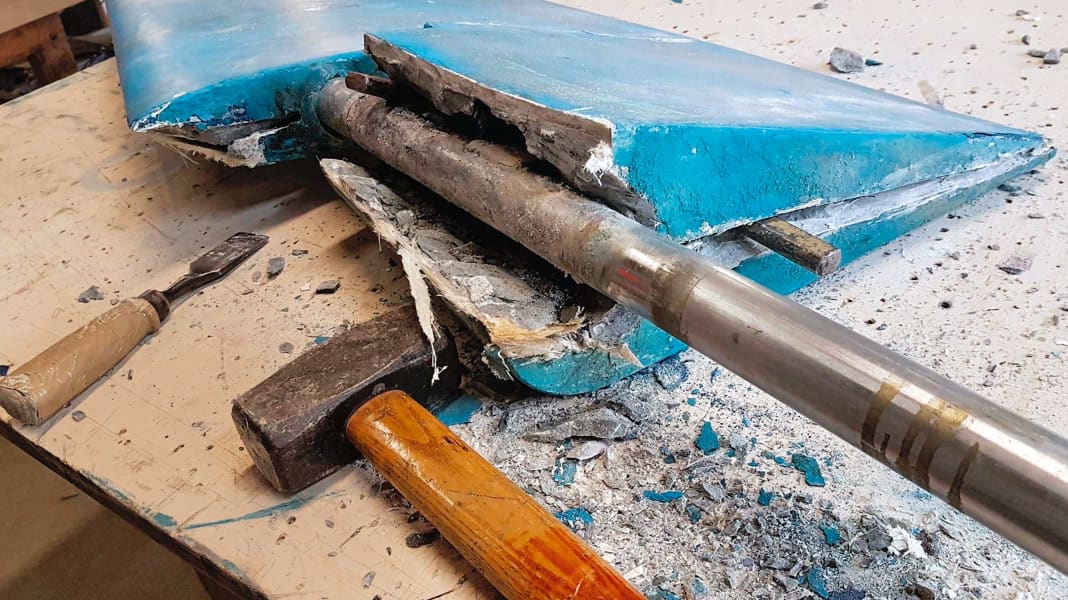
What the steering forces cannot do when sailing, the frost in winter storage can sometimes do. As soon as the water freezes inside, it expands and cracks the halves with brute force. Boat builder Wolfram Heibeck knows this well enough. His company Spezialbootsbau in Hooksiel is an insider tip for the new construction and optimisation of rudder blades. "The old blades are often frighteningly easy to dismantle. We can already guess what awaits us inside," says Heibeck.
For new builds, he tries to continue using the existing rudder shaft where possible. However, there are often corrosion problems, especially with aluminium shafts. "The area where the shaft goes into the blade is particularly affected. The aluminium is often so pitted there that it is better to use a completely new shaft." According to design engineer Menzner, pitting can now also be observed more and more frequently in stainless steel shafts.
Damage patterns
Cracks & water marks
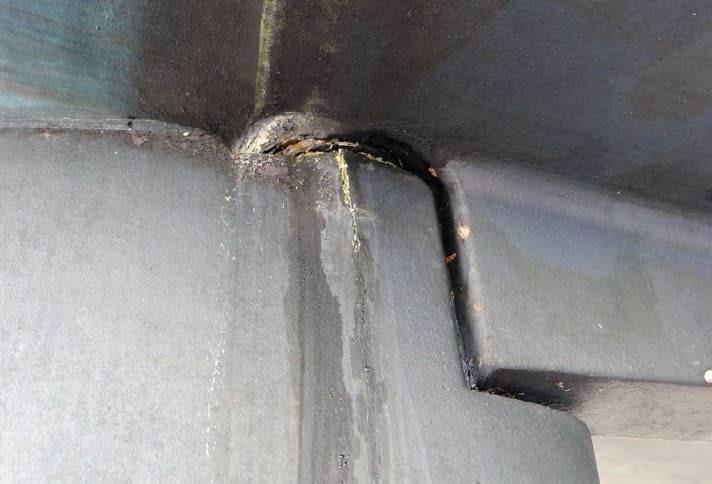
The transition to the rudder shaft is the most heavily stressed area of the blade, which is why visible damage often occurs there. This often occurs in combination with water ingress, which expands during frost. Ice formation also favours the bursting of the adhesive joint of leaves built in half shells. In the early stages, the damage can be recognised in winter by persistently damp patches in the antifouling. Which edge cracks first is a question of processing. The bonding is usually worst at the front and bottom

Osmosis & adhesion problems
Bubbles like these can also be caused by detachment in the paint system. The origin can be easily clarified with a scraper. If the gelcoat is intact, there is no problem, at least from the outside. Osmosis damage caused by water penetrating the rudder is much more critical. Inside, the hydrolysis of the polyester resin remains unnoticed until serious damage such as a loose rudder shaft or massive cracks occur. If you drill into the affected blade, acidic and strong-smelling water escapes

Corrosion
Corrosion damage to the rudder shaft caused by water ingress is also barely visible from the outside. Crevice corrosion is particularly insidious. It occurs preferentially in the area where the shaft enters the blade, exactly where high loads occur. Although the metal is encased in resin here, moisture can enter through hairline cracks and trigger an electrochemical reaction. Untreated aluminium shafts are the most vulnerable and are also susceptible to galvanic corrosion in conjunction with copper-containing antifouling. Anodised rudder axles are somewhat more robust. However, they are not immune to crevice corrosion. Galvanic corrosion is not a problem with stainless steel shafts. However, they are not immune to crevice corrosion. The extent is less than with aluminium and depends heavily on the quality of the alloy
Repair or new build?
So there are more than enough potential problems, but what to do if the blade of your own yacht is affected? Basically, there are three options to choose from: repair, rebuild or replace with a compatible mass-produced blade
The most obvious solution is to repair the existing rudder. There are countless articles about this on the web. However, the repair is not as simple as it seems. It starts with the moisture in the blade. It is practically impossible to dry a saturated foam core by drilling holes, no matter how many there are. Initially, a few litres may run out of the blade quickly, but experience has shown that even at the end of a winter season, water still drips out of the hole once a week.
Additional vacuum and heating improve the situation, but moisture still remains in the foam. In addition, the holes make it difficult to recognise how far the laminate has already been damaged by hydrolysis.
The rudder must therefore be opened over a large area and the wet core material removed. It is then necessary to recognise and repair any osmosis damage. This is also not easy in the labyrinthine interior of the blade.
Repairing the rudder blade is time-consuming
Finally, a new core must be built. The best way to do this is to use moulded structural foam such as Divinycell. The remaining cavities are filled with foam, which also requires a special product. Construction foams or similar products have no place there. They are not closed-cell and expand far too much. As a result, the hardened foam either does not have the necessary density, or there is so much pressure that the rudder shell bursts.
Standard rudders are foamed in screwed aluminium moulds due to the enormous pressure. This is not possible retrospectively. Professionals therefore use epoxy foam. Although the material is relatively expensive, it is water-resistant and, with an expansion ratio of around one to three, generates comparatively little pressure with a uniform density. The disadvantage of the system is that it only takes a few minutes to process; however, the component sometimes has to be tempered for many hours at more than 40 degrees for the foam to harden completely.
The core is then sanded into shape and the blade is laminated, filled and sanded again. In principle, the rudder can also be sealed first and then filled with foam. This saves sanding work, but dosing the foam is much more difficult. There must also be enough levelling holes so that the foam does not burst the blade.
Repairs by specialists can be expensive
All in all, a lot of work, especially as the basic problem of possible moisture ingress at the rudder shaft has not been alleviated. Usually, a recess is milled into the upper side of the blade around the shaft and a joint of sealing compound is applied. This is a solution that Jefa now also recommends as a preventive measure for new blades.
Of course, such repairs can also be commissioned. "We work on around 250 underwater hulls every year, and about half of them need a rudder blade repair," says Kirsten Wrede from repair specialist Peter Wrede Yachtrefit. Thanks to sandblasting technology and an annealing chamber, the professionals can refurbish the blade efficiently. "The work varies depending on the actual extent of the damage, but as a general rule you can expect around 40 hours for a ten-metre yacht," says refit expert Florian Brix. This means that a complete refit costs around 4,000 euros.
This roughly corresponds to the cost of a customised new build, as offered by rowing specialist Heibeck. The main arguments in favour of a custom-made product are the possible optimisations to the shape and profile as well as the material used. "Compared to the standard rudder, we can usually always improve the steering and sailing characteristics," says Heibeck. In addition to the profiling, the aspect ratio of the blade plays a particularly important role.
Optimisation of the rudder blade
Design engineer Menzner confirms this: "A deeper and narrower blade is always more efficient." It provides more lift even with small rudder deflections and retains grip longer even when heeling, as it can dive further without ventilating completely. This occurs when the blade draws air on the windward side, which leads to a stall and loss of rudder effect.
The increased buoyancy at small rudder angles also makes the boat more manoeuvrable and helps the autopilot to steer.
With large rudder deflections, narrow rudder blades tend to stall more than wider blades. However, this disadvantage can be compensated for by a slightly thicker profile. However, this increases the resistance of the rudder. The trick here is that as the narrow blade also generates more lift, it usually sails with a lower angle of attack, which in turn reduces drag and makes it more efficient overall. Above all, however, the limit range is larger and the boat sails more controlled when heeling heavily.
Customised rudder blades as the optimum solution
Changing the silhouette to a deeper blade with an adapted profile is therefore standard at Heibeck. Once the geometry of the new blade has been determined, the old rudder is dismantled so that the shaft can still be used. This often reveals further damage, which makes it clear that a new rudder is the only sensible alternative. Unlike standard rudders, Heibeck uses the positive method, which means that the outline of the blade is cut from core material and the rudder shaft is glued firmly to one side of the foam. Solid laminate is used there so that the trailing edge can be sanded thin to optimise flow. The second side of the core is then applied with epoxy resin and glued in a press. After curing, the desired profile is milled into the core and the blade is laminated with several layers of glass or carbon fibre fabric.
It is therefore virtually impossible for the blade to burst. As the rudder shaft is completely encased in resin, moisture penetration is not a problem. Side effect of the design: The epoxy rudder blades are usually significantly lighter than standard models.
Large series blades as an alternative
The custom-built rudder blade is the best technical solution against water damage and has the greatest potential for optimisation. Sometimes, however, large series blades can also be adapted, for example those from Jefa. The Danish manufacturer offers around 30 different types for yachts from 22 to 75 feet in length and supplies Hanse, Bavaria and a number of small series shipyards, among others.
"After customisation, this is the second best way to get a new rudder blade," says Menzner. The standard rudder will not match the old blade perfectly, but this is not usually a problem. "The surface area should be about right, but you should choose a slightly larger blade with the maximum draught," says the designer. He cites the sporty LA28 daysailer as an example. Depending on the customer's requirements, the boat can be delivered with an adapted standard blade from Jefa or with a specially calculated carbon fibre fin built by Heibeck. The difference is noticeable.
By inserting filler pieces into the mould, the Danes can change the draught or the hull connection of the standard blades, for example. This can be cheaper than having the adjustments made later by a boat builder. In terms of price, the standard blades are in the same range as a refurbishment or customisation. However, you automatically get a new rudder shaft; old rudder stocks cannot be used in production.
Regardless of which solution you choose, you should also keep an eye on the bearings when working on the steering gear. For systems with plain bearings, it is advisable to convert to self-aligning spherical roller bearings, which greatly reduce friction. As the bearings allow the rudder shaft to bend slightly, the system no longer jams under heavy loads and the steering becomes much more sensitive and smooth-running. If you are already sailing with spherical rollers, you should take the opportunity to service the bearings and replace worn rollers.
How the new rudder construction works
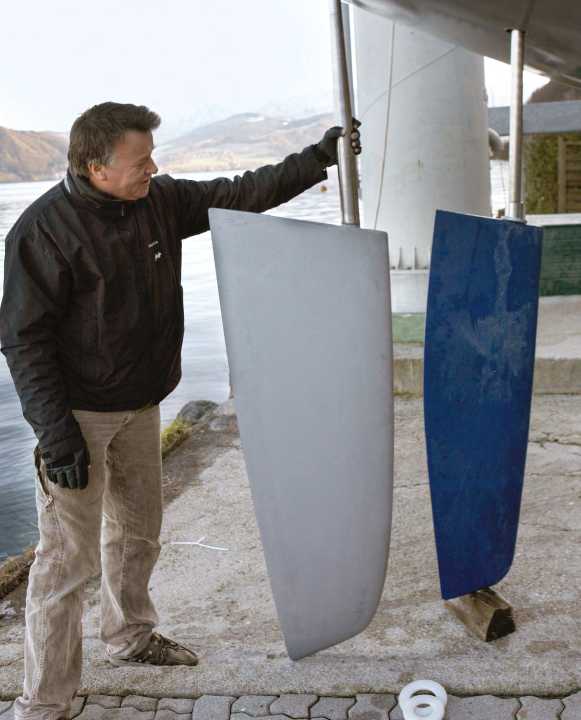
Optimisation
The steering behaviour depends heavily on the shape and profile of the rudder blade. Both parameters can be easily changed when building a new model. The main focus is on the aspect ratio. A deeper blade generates more rudder effect, the yacht becomes more agile and sails longer in a controlled manner when heeling. The stall can also be delayed with an adapted profile. The change rarely has to be as extreme as in the picture. The original grey rudder generated enormous steering forces even in light winds. With the narrower blade, the boat not only sailed more agilely, but could also be kept on course with two fingers

Exposing the rudder shaft
The old rudder shaft is reused for new construction, as offered by Heibeck's company Spezialbootsbau. When dismantling the old blade, it often becomes clear how far the deterioration has already progressed. This half-skeg rudder still looks surprisingly good. However, a trace of water can be seen along the shaft. The foam is already discoloured by rust

New construction of the core
The contour-cut core half is glued to the shaft. Solid laminate is applied to the rear edge. The second half of the core is then glued on with epoxy resin and everything is pressed together. The profile is then milled into the sheet and the load-bearing glass or carbon fibre laminate is applied. During levelling, the profile accuracy is checked using templates
Repair by a professional
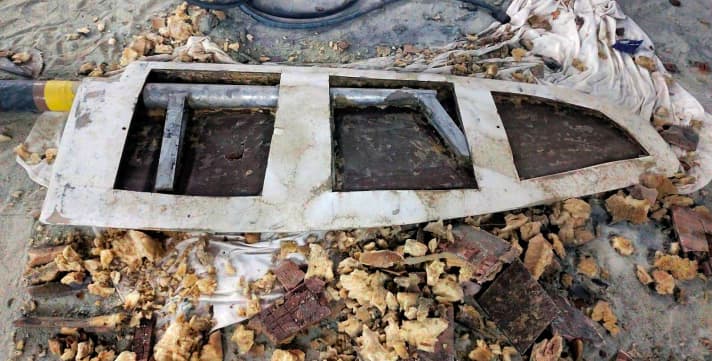
Sawing & hollowing out
To remove moisture from the rudder, Peter Wrede Yachtrefit cuts windows in the blade and removes as much of the wet core material as possible. The interior is then sandblasted. This also removes the last traces of foam and any osmosis residue. After this cleaning, all damage is clearly visible and the structure of the blade is checked
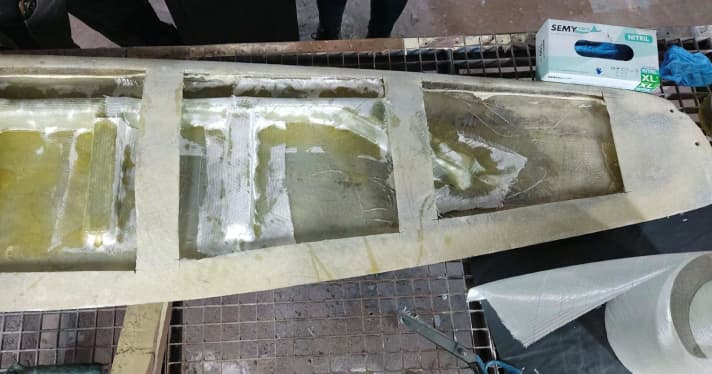
Gluing & laminating
Sandblasting leaves the shaft bright and, like the laminate, optimally roughened. To restore maximum strength, the cavities between the GRP shell and the metal are filled with epoxy adhesive. In addition, the shaft and spokes are laminated to the rudder shell over a large area

Filling & foaming
Once everything has hardened, the core is rebuilt. Foam pieces are fitted into the large cavities and bonded with thickened epoxy resin. The remaining gaps are filled with high-strength epoxy foam. Due to the comparatively low expansion of the material, it is easy to dose

Lock & reinforce
After plastering the foam, the cut-out covers of the original laminate are reinserted with thickened resin. The rudder blade is completely laminated over from the outside as reinforcement and to prevent cracks in the bonding of the half-shells. Epoxy resin is used for this

Filling & priming
Filling and sanding work is required to bring the blade back into shape. How exactly the profile corresponds to the original shape depends on the care taken by the boat builder. If the work is done by eye, this can have an effect on the steering behaviour. Epoxy primer follows after filling
How a rudder blade is produced in series
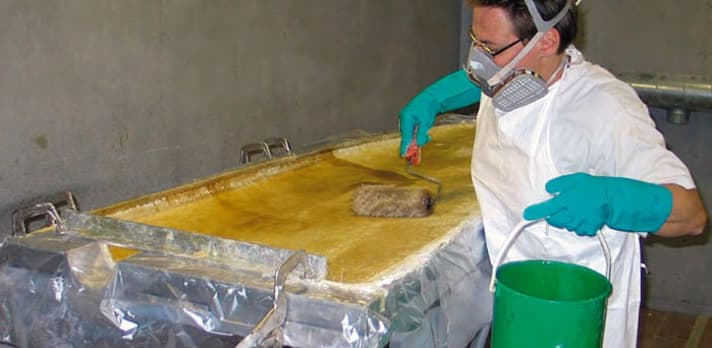
Laminating
The rudder is built in two halves, similar to a fuselage. Jefa manufactures in negative moulds milled from aluminium. Laminating is done by hand using polyester resin. Several layers of standard glass mat weighing 300 to 600 grams per square metre are usually used. The rudder remains in the mould until completion

Pasting
Once the resin has set, the edges are plastered and the rudder shaft is glued in place. Additional laminate strips fix the spokes in place. This is followed by polyester glue and the liquid foam. The mould must be immediately closed with the second half and screwed together. The foam expands and the rudder is glued in place

Customise
Jefa has around 30 different types of rudder on offer. In addition, the hull connection and the draught of the blades can be changed with the help of fitting pieces placed in the mould. For mass-produced boats, the fillers are milled from aluminium. Thanks to 3D printing, however, the technology can also be used for individual constructions or small series. This saves adjustments by the boat builder

Smooth-running bearings
In the case of rudders with plain bearings, supposed rudder pressure is often caused by bearings jamming under load. This problem does not exist with self-aligning spherical roller bearings from Jefa. They run smoothly even under high loads. A coker tube, bearing and fitting sleeves are required for retrofitting. The conversion requires comparatively little work, but the effect is enormous
Widespread types of rudder blades
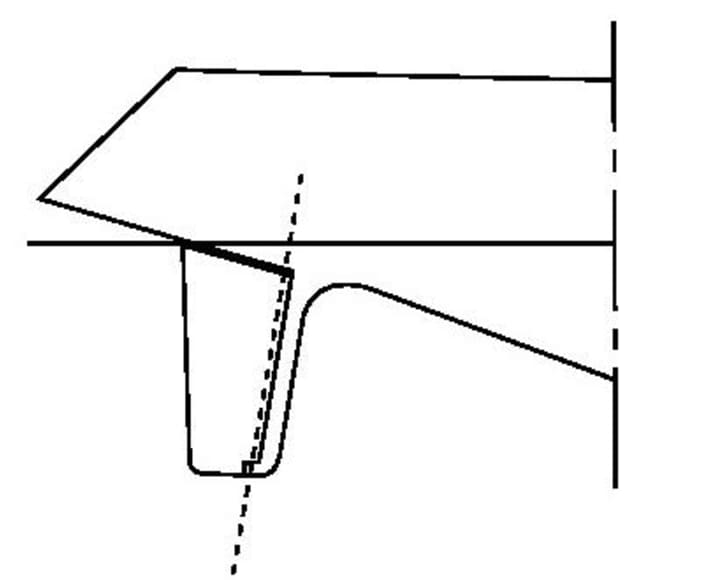
Full skeg
A rigid nose, the skeg, is located in front of the actual blade. It receives a clean flow regardless of the rudder deflection, so the flow only breaks off at comparatively large rudder angles - provided the transition to the blade is hydrodynamically clean. Large steering forces arise without pre-balancing

Half skeg
A further development of the skeg rudder. As the lower part of the blade extends in front of the axis of rotation, the steering forces are smaller. In principle, a gap is created at the lower end of the skeg to equalise the pressure between the sides of the profile, which reduces the effectiveness of the rudder and it has to be larger

Freestanding
Also known as a balance or spade rudder. The most common design for cruising yachts today is hydrodynamically the most efficient. Around 16 per cent of the rudder surface is in front of the axle, which ensures low steering forces. Properly dimensioned, the design is at least as robust as a half-skeg rudder
